
So You're Ready?
Writing your first post is either going to be very easy for you, or very difficult. It all depends on how you feel about writing. Let me clarify a bit more. The writing aspect of it, what to write, what to include, how to structure it, it's all fairly straight forward and I will give you some examples below.
The only reason it is difficult is because a lot of people are scared of writing something wrong, making a mistake, or not being able to make it perfect.
Don't let these thoughts control you. How will you ever know if your work is perfect if you can't get it out there in the first place?
Ready. Fire. Aim!
In the case of writing for your website and growing your business, you are going to find that often the best thing to do is just get the content out there first, and test it and adjust it later.
I know, it's not a nice idea, and you especially won't want to share content that you don't consider amazing yourself. Think about it this way instead. Every word you write and publish gets you one word closer to writing and publishing that awesome content that is the end goal.
Just like you can't learn a lot of things from reading about them, writing is another thing you learn about by doing it. So get yourself ready, fire off that page, then adjust (aim) later!
Writing Your First Post – Getting Down To It
OK, now that I've explained a little bit about the psychology behind writing and learning to write good content, it's time for you to get started.
Once you've chosen the topic of your first post or page, you need to do a little bit of preparation and if necessary, research.
It's best if you choose a topic you know about first, but there might still be the odd bit of research to do.
Here's how I usually prepare for writing a post:
1.) I think about the title, what are people who search for this going to want to know the most? What questions will they have? How can I answer those questions? Can I recommend a product or service to them to further help? (What's in it for me the writer?)
2.) I think about the best structure for it. I usually write a few bullet points (either in the post editor itself, or on a notepad) with a rough “order of points”. The first thing I will write about is X, then I will say Y, then I will talk about Z etc etc.
3.) I make notes of anything I'll need to research.
4.) If I am promoting something in this post, do I need to write a separate post reviewing that product first? (If it is something I will promote a lot, I write a review, if it is just a one off promotion, I usually don't bother).
5.) Will I need to make any diagrams, videos, or other supplementary content to go with the post?
This doesn't usually take very long once you get used to it, but you should always have these questions in the back of your mind.
Writing It Out
Once you get started, it's best not to edit “on the go”. It is very tempting to write a line or two, then read back what you've done. The amount of times I used to hit the “preview” button to see how my work looked when I was a beginner astounds me. It's just the same as before, but with two extra lines!
It is much better if you write as much as you can in one sitting. Pay attention to formatting and make sure you aren't just waffling, but definitely write the whole paragraph and point, then pause, check the next thing you want to say, and write it. Then by all means go back and edit, proofread, tweak and “neaten up” your work afterwards.
Try not to leave yourself signed in to Skype, MSN, Facebook or a similar application where a message or notification can interrupt your flow. It should only take you 30 minutes to 1 hour to write out this first post. I'm sure you can cope without your social networks for that long.
Structure
For the actual structure of your post, you can look at this one as an example. Notice how I don't like to write more than 3 lines before I put a space in? I also use headings (usually ‘Heading 2') and things like quotes, underlines, or other methods to break that text up.
The Internet is an incredibly visual place these days, and Internet users have an equally incredibly short attention span. Make it easier for them by breaking up that text.
Images are great too, but only use them where relevant. I like to have one at the top as a kind of “banner” and I will use ones further down the page if they are necessary to help illustrate a point. It depends on how long the post is too. This one is coming up for 900 words right now, so I think an image is due.
Save That Draft!
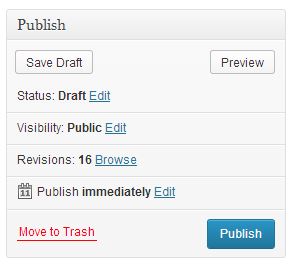
Whenever I pause to take a breath in my writing, I hit the “Save Draft” button. It's good to get into a habit of hitting that button often. WordPress does make autosaves as you go, but I often find that they are not frequent enough.
That last thing you want to do is accidentally close the tab (Use ctrl+shift+T in Chrome to get that tab back), hit the “back” button, or have some other issue that will cause you to lose your content.
Also, if you need to leave your work and come back to it later, saving a draft allows you to keep it offline. When that content is finally ready to go live, hit the blue “publish” button and you are good to go.
Adding Images
I like to use fotolia and buy a couple of cheap but very high quality images when I first start a site. It's good to get off to the right impression, and adding some quality images (which by the way, are royalty-free) is a great way to do this. Head over to fotolia.com if you want to learn more about this. (The main image on this post is from fotolia)
To add an image to your post. Hit the “Add Media” button at the top of your dashboard. From there you can upload an image, or use one previously uploaded by selecting it from the “Media Library”. For more information on using images, follow this blog post at Wealthy Affiliate.
To learn the actual act of uploading and adding images follow this training. Please note, when this training was made, the “Add Media” button icon was different.
CheatSheets!
I've created a “Cheat sheet” from both an SEO and content writing perspective for you. It's basically a checklist of things to consider before publishing your posts. Get it here.
Getting Feedback
One final aspect of learning how to write well and product fine looking content, is getting feedback. It's not going to be something like handing in a piece of work for a teacher to grade. It's more a case of “Hey, here's my first post, what do you think?” and somebody will reply with some tips on things you could improve. Make this image bigger, make that white space smaller, break up the text more, etc, etc etc.
Where can you do this?
Right here. At the bottom of this post I have opened up the comments section and I encourage you to share your first post (or even your second or third posts) below. Don't just post the link though. Write a few sentences about how you felt while writing it, what you like about it, what you found difficult (maybe you struggled to use the heading button) and so on.
I for one will reply with some helpful tips, and I'm pretty confident lots of others will reply too.